

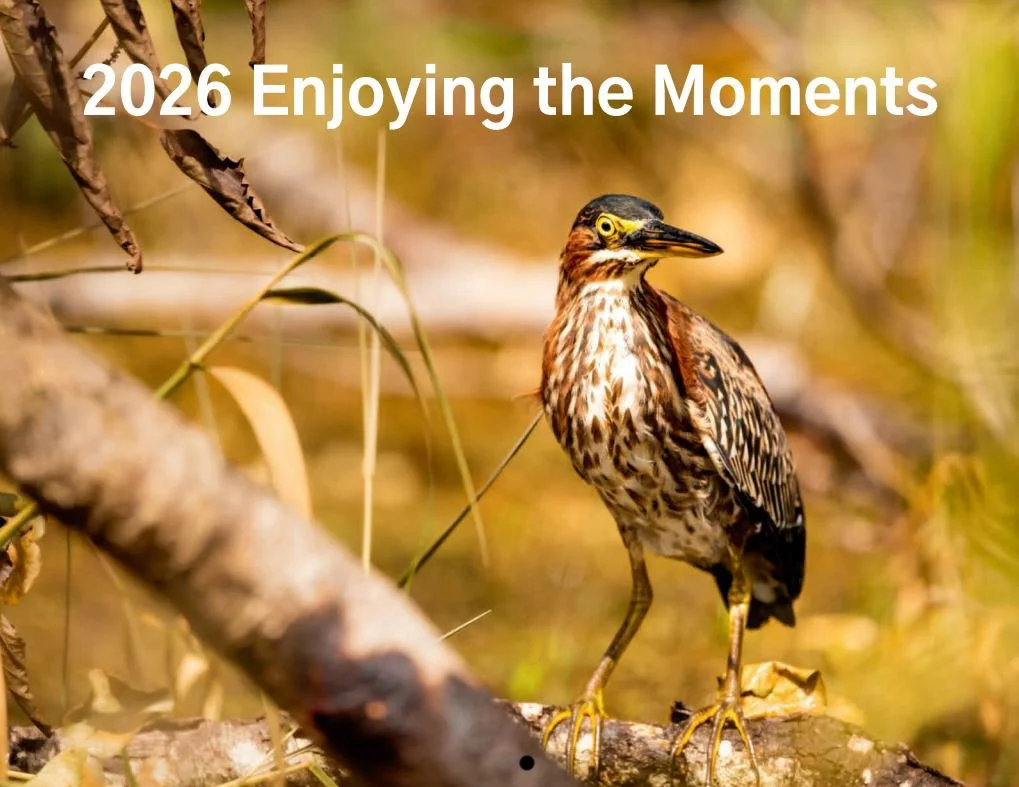
🎉 Running Out! The 2026 “Enjoying the Moments” Calendar is almost gone!
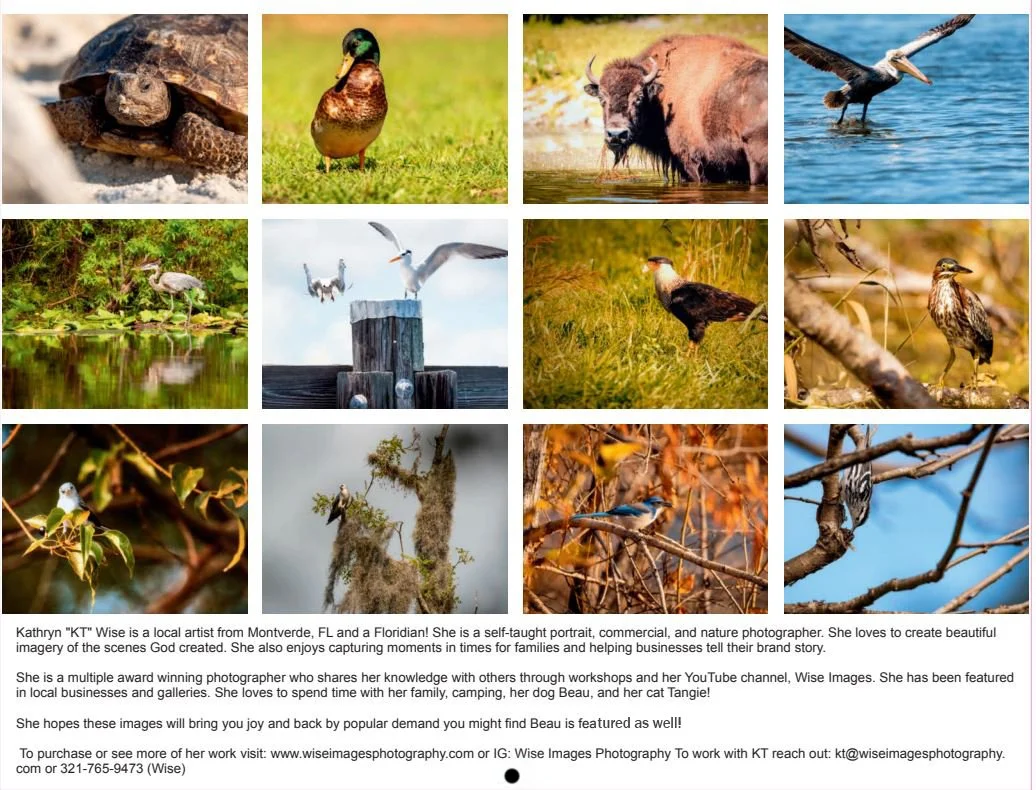
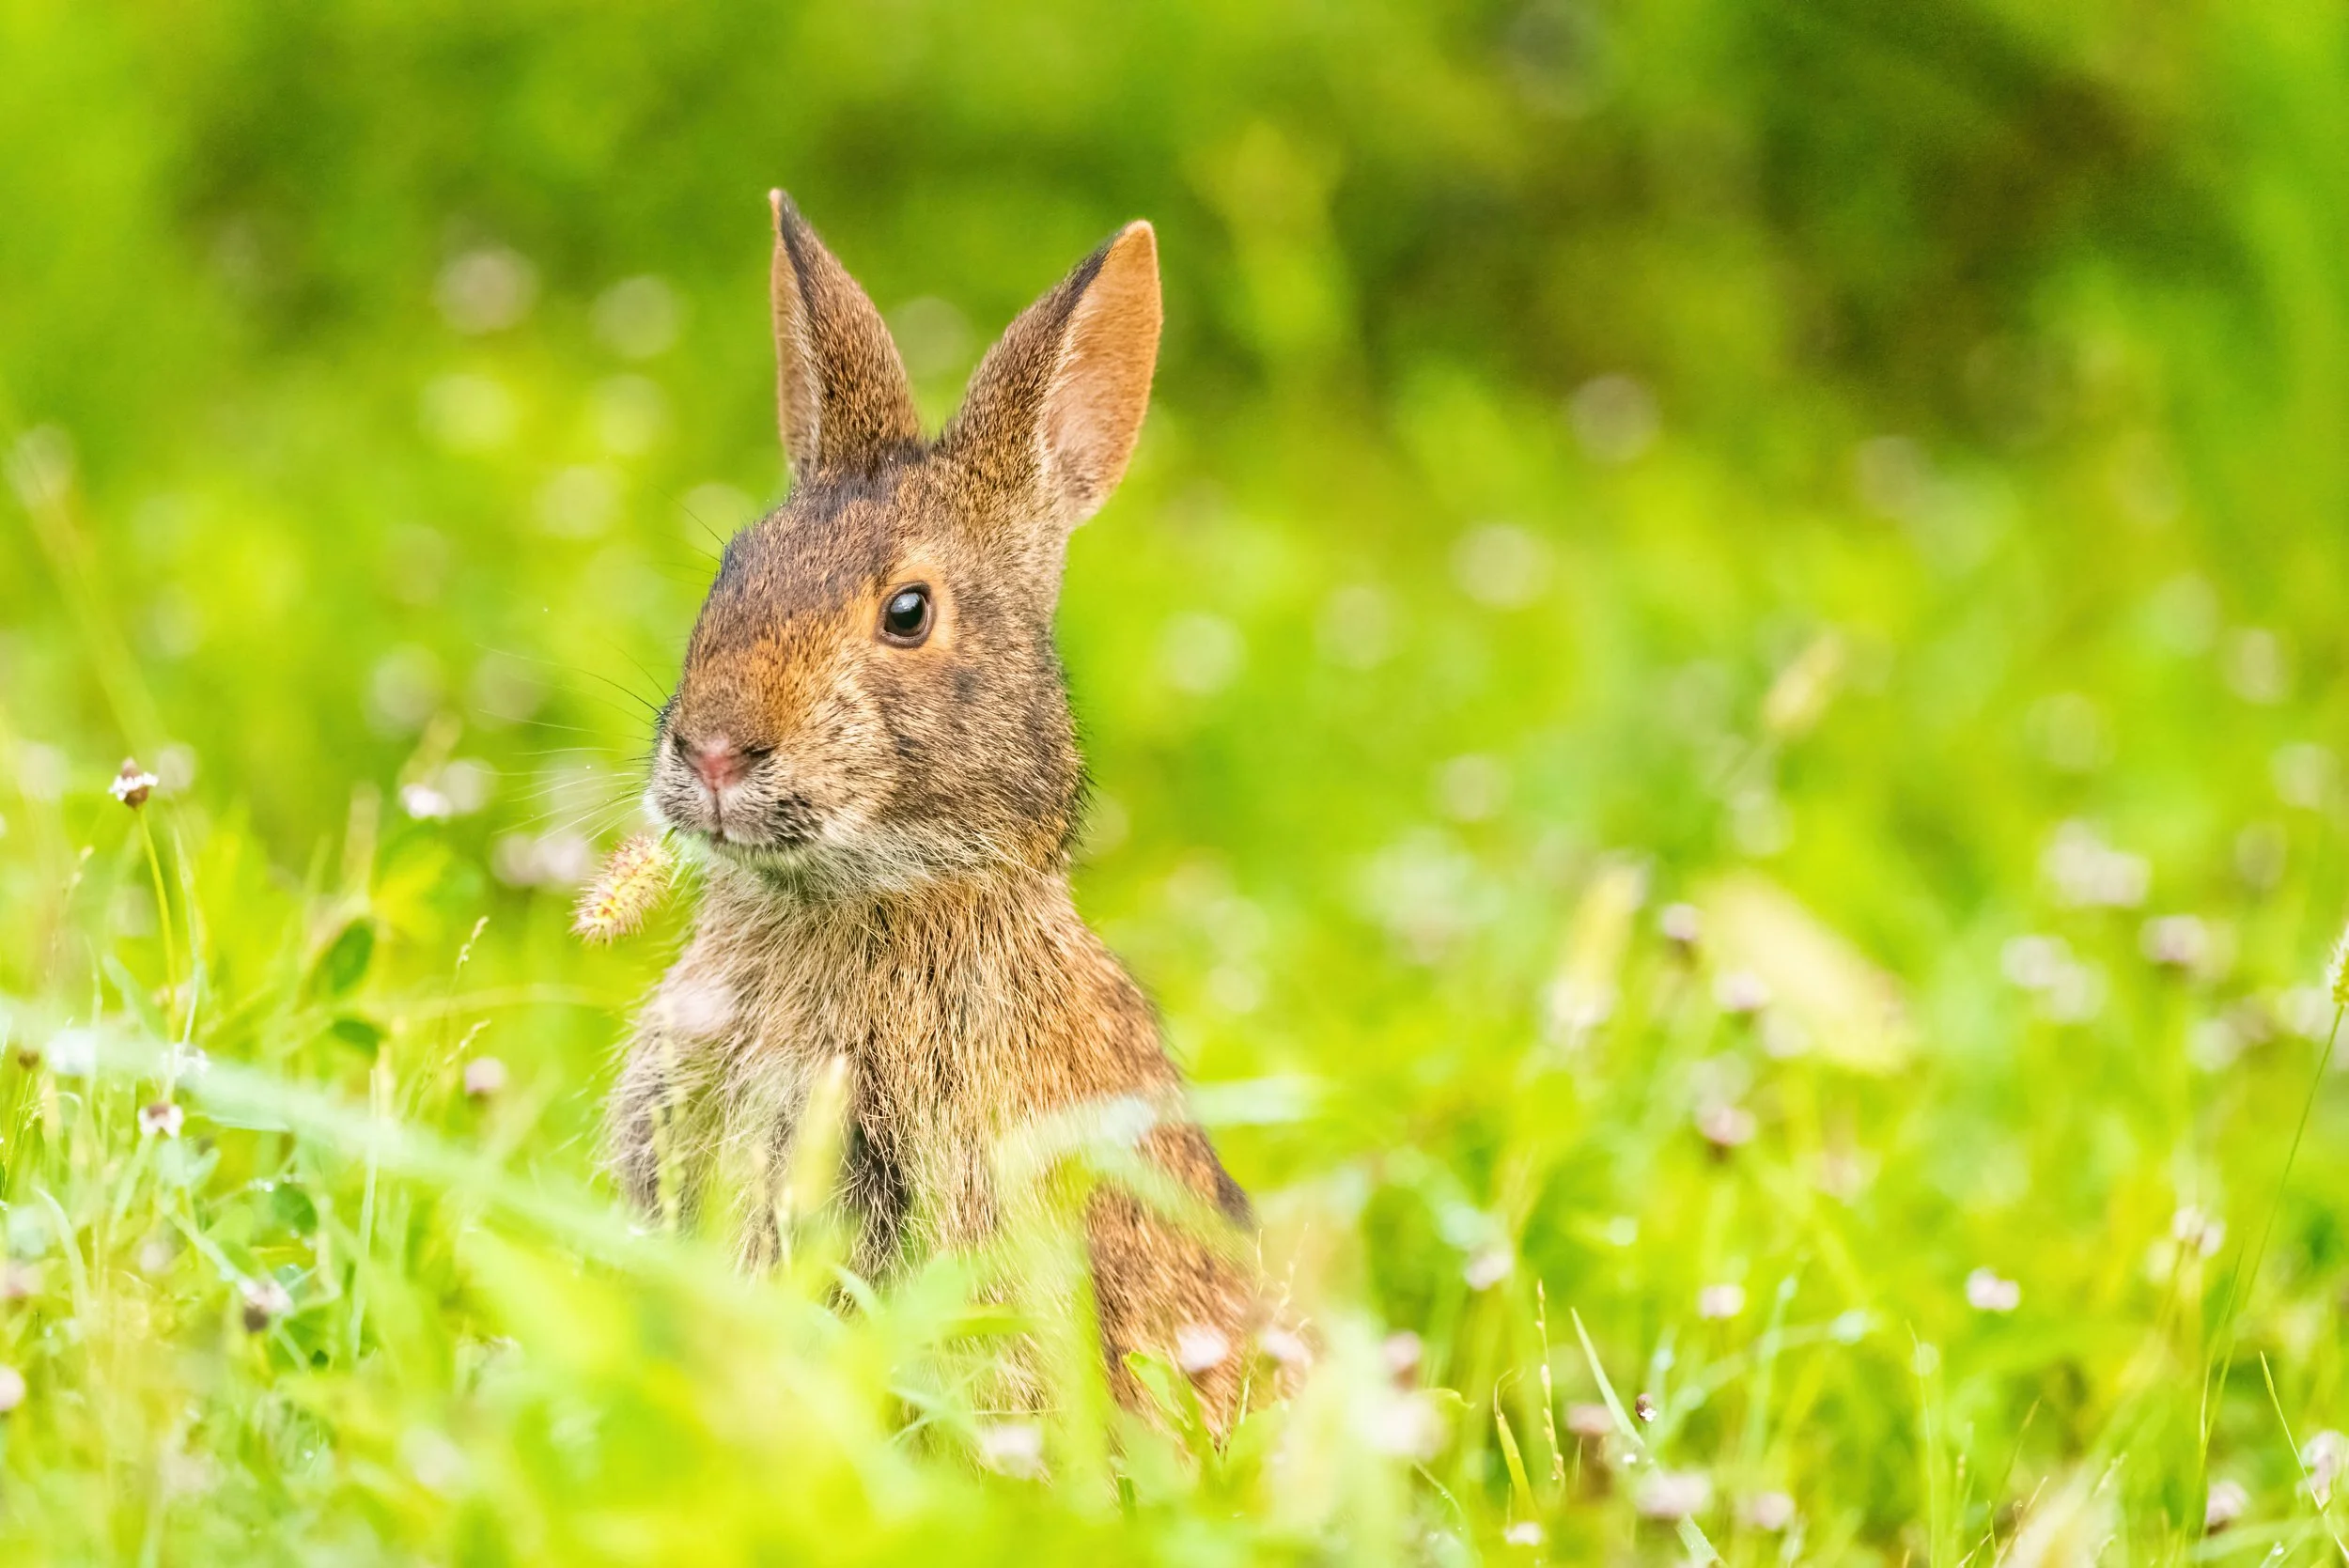
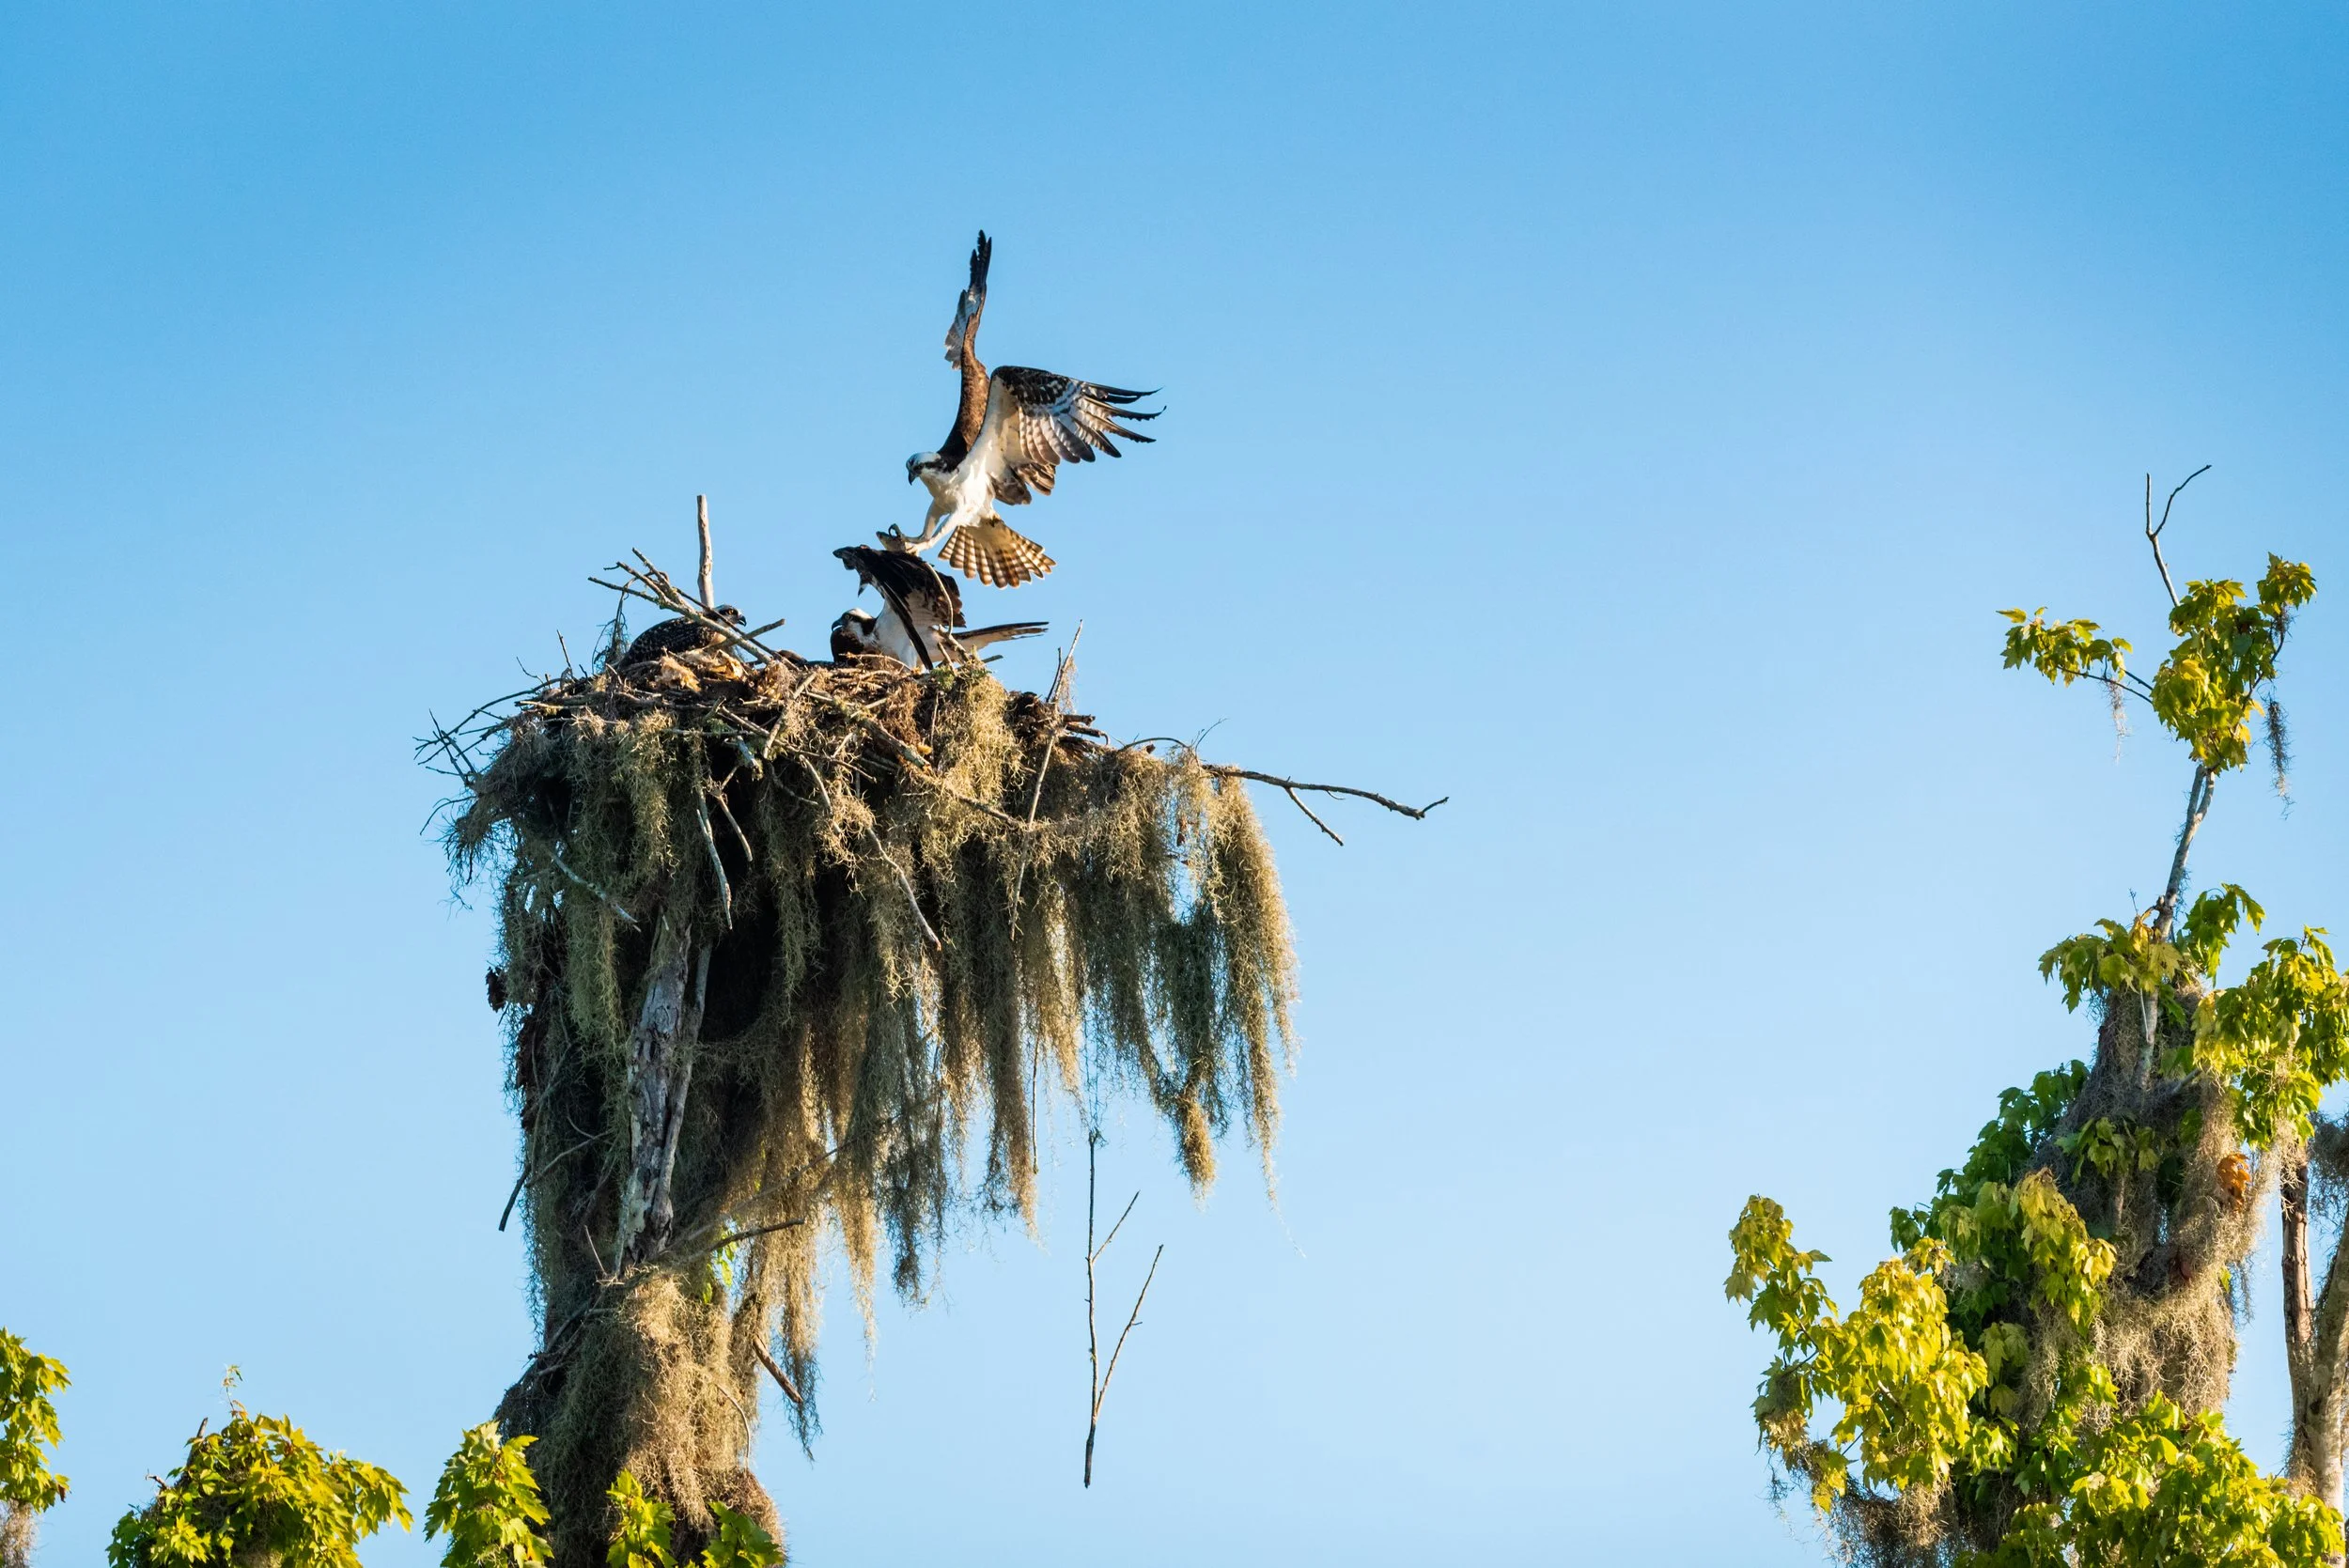
Featured in our 2026 ‘Enjoying the Moments’ Calendar, this stunning image captures the vibrant beauty of Florida birds in their natural habitat. Showcasing rich colors, graceful movement, and breathtaking detail, it’s a perfect example of wildlife photography that brings the wonder of nature into your home. From bird lovers to wildlife enthusiasts, this calendar combines Florida birds, majestic buffalo, and fan-favorite Beau for a year-long celebration of the outdoors.
We have limited amounts left! Get your year of wow with breathtaking Florida birds, powerful buffalo, and the fan favorite himself! Beau is BACK as your bonus image! 🐾✨
Every page is a reminder to slow down and savor the beauty around us. Perfect for your home, office, or as a gift for the nature lover in your life.
👉 Tap the button below and grab yours before they fly off the shelves!


🗓️✨ The 2026 “Enjoying the Moments” Calendar is HERE! ✨🗓️
Featured in our 2026 ‘Enjoying the Moments’ Calendar, this stunning image captures the vibrant beauty of Florida birds in their natural habitat. Showcasing rich colors, graceful movement, and breathtaking detail, it’s a perfect example of wildlife photography that brings the wonder of nature into your home. From bird lovers to wildlife enthusiasts, this calendar combines Florida birds, majestic buffalo, and fan-favorite Beau for a year-long celebration of the outdoors.
Watch a year of wild beauty! 🐦
The 2026 ‘Enjoying the Moments’ Calendar is packed with stunning Florida birds, majestic buffalo, and yes… Beau is back by popular demand for your bonus image!
Every page is a moment to pause, breathe, and soak in nature’s wonders. Perfect for your home, office, or as a gift for anyone who loves the wild.
🎯 Don’t wait click the get your calendar button and bring the beauty home today!
🌿✨ The 2026 “Enjoying the Moments” Calendar is HERE! ✨🗓️
Featured in our 2026 ‘Enjoying the Moments’ Calendar, this stunning image captures the vibrant beauty of Florida birds in their natural habitat. Showcasing rich colors, graceful movement, and breathtaking detail, it’s a perfect example of wildlife photography that brings the wonder of nature into your home. From bird lovers to wildlife enthusiasts, this calendar combines Florida birds, majestic buffalo, and fan-favorite Beau for a year-long celebration of the outdoors.
If you love nature, this one’s going to steal your heart!
Hang with Florida’s stunning birds, roam with majestic buffalo, and yes… by popular demand…Beau is BACK to grace your walls for another year as your extra photo!! 🐾❤️
Every month brings a new moment of wild beauty the perfect daily reminder to pause, breathe, and enjoy the world around us.
Ready to bring nature home?
👉 Click the button below to get yours today!


High School Seniors in Motion
Because standing still is overrated...
Movement isn’t just for birds because it’s one of the easiest ways to bring life, confidence, and personality into your senior portraits! Whether you're camera-shy or ready for your close-up, adding a little natural motion helps you feel more relaxed and makes for dynamic, unforgettable photos.
Here’s how we bring the magic of movement to your session:
🚶♀️ Prompted Movement
No stiff poses here…ok…maybe sometimes but not all the time…anyways...I’ll guide you through walking, twirling, tossing your hair, or adjusting your jacket because natural motions feel fun and effortless while adding energy to the frame.

🌊 The Power of Location
We’ll often shoot near water (think lake edges), especially during golden hour. The soft light, reflections, and windblown hair add movement without you even trying. It’s dreamy, cinematic, and totally Instagram-worthy.
🎒 Storytelling Moments
Some of the best shots happen in between like when we are walking to a new spot, fixing your sleeves, laughing at something off-camera. These moments are full of emotion and realness and they capture who you are right now, in the best way. So don’t freeze like a deer in headlights if you see me bring my camera up to my face. 😎

🎧 Bonus: Bring Your Headphones
Want to move more naturally? Let’s put on your favorite playlist and capture you just vibing to your favorite song. It brings out authentic smiles, candid motion, and a spark that no stiff pose can match.
✨ Your senior session should feel like you completely effortless, expressive, and full of movement. Let’s create photos that feel alive.
📅 Ready to book or have questions?
Let’s chat and start planning their session!

Film Grain in Dehancer//How to get film grain in your images?
Ever wonder how people get their images to feel cinematic? The answer often comes down to film grain which is the secret sauce behind that timeless film look.
In this video, we dive into Dehancer’s Film Grain tool and break down:
✅ What film grain actually is (and how it’s different from digital noise)
✅ Why photographers still add grain in a digital workflow
✅ The subtle magic grain brings to your images
✅ How Dehancer lets you control and customize grain for your creative vision
We’ll compare photos and explore why grain is not the same as noise, and show you how to use it to elevate your storytelling. If you’re looking to add a little something to your images, this is the video you don’t want to miss.


Golden Hour Glory: Capturing a Crested Cormorant on Lake Apopka//August Calendar Shot!
Join me behind the lens as I reveal the story behind my August calendar photo. It is a striking Crested cormorant in the moment he starts to take flight in the golden hour light on Lake Apopka. 🌅📸
In this video, I’ll dive into: What drew me to this shot and why it made the calendar 🗓️ My favorite elements and a few things I wish had done differently. The techniques I used to catch this bird at just the right moment.
Whether you're into bird photography, nature, or just love Lake Apopka's magic, this one's for you.


Why We Move: What Migration Teaches Us About Timing, Trust, and Creative Flow
Most of us don’t naturally wake up one morning and say, “Hey…you know what? I’d like to fly 3,000 miles with no snacks, no map, and only the sun and stars for GPS.” Y’all saw in the Lake Apopka Wildlife Video I like my snacks and I’m a planner with my checklists!
But birds do. Every. Single. Year.
So why do birds do this? Because migration like all great leaps in life isn’t just about movement for the sake of moving. It’s about knowing when to go, trusting the journey, and flowing forward even when the destination is a mystery or to us scary!

🕰️ Timing is Everything (Except When It Isn’t)
In migration and creativity, timing sometimes feels like magic. There’s that sudden tug or a nudge to change, to create, to head somewhere new. Birds don’t get weather alerts or workshop emails; they just know. And, surprisingly, we often do too.
And sometimes, we may ignore the signs and binge-watch wildlife documentaries instead of starting that photo series or learning a new skill. But deep down, we feel the moment when it’s time to move. Creativity, like migration, has a rhythm and you just have to catch the current.
Pro Tip: If it feels scary but exciting… it’s probably time to flap.
🌊 Trust the Weird Route
No migrating animal knows exactly what the trip will bring. Detours? Definitely. Storms? Probably. Giant detours involving unexpected travel buddies and side quests? Absolutely. Yet still, they go.
In creative life, we plan projects and they somehow become something totally different and yet...better or something you never expected! Oh, happy little accidents! 😁😁 We may even look like a sea turtle zig-zagging its way back home and lost but really it’s because we’re just taking the scenic route. We are letting our creative juices flow like the water! That’s the magic of trusting the process.
💡 Flow Over Force
Birds don’t muscle their way through the sky. They catch thermals, ride tailwinds, and follow flow and do not hustle. Imagine if you could do the same with your creative work or life in general?
Instead of pushing and stressing, what if you looked for that natural lift? The right light, the right moment, the right mood? Migration teaches us that momentum isn’t always about grinding forward but sometimes it’s about gliding smartly with purpose. Like one of my favorite bosses used to say to me…Work smart…not hard!
Final Landing: Move with Meaning
Whether you’re a goose heading south or a photographer chasing golden hour in a marsh, the lesson is the same: you don’t have to know everything to move. You just have to listen, leap or flap, and trust that your wings or your work will carry you.
So go ahead and start the project, take the photo, or try the thing. The skies are wide and the water’s waiting.
Because staying in one place forever? That’s for garden statues.

The Secret to Photographing Birds in Flight 🦅📸
Capturing birds in flight can be one of the most challenging and rewarding skills in wildlife photography. In this video, I’ll take you step-by-step through the essential camera settings, autofocus techniques, burst mode shooting, and panning practice that will help you get sharp and more dynamic shots of birds.
Whether you’re a beginner or looking to refine your bird photography skills, you’ll discover:
✅ The best camera settings for action shots
✅ How to use autofocus continuous mode for tracking fast birds
✅ Why burst mode is your best friend in flight photography
✅ Panning practice tips to add motion and drama
✅ Pro-level tricks to anticipate bird behavior and nail the shot


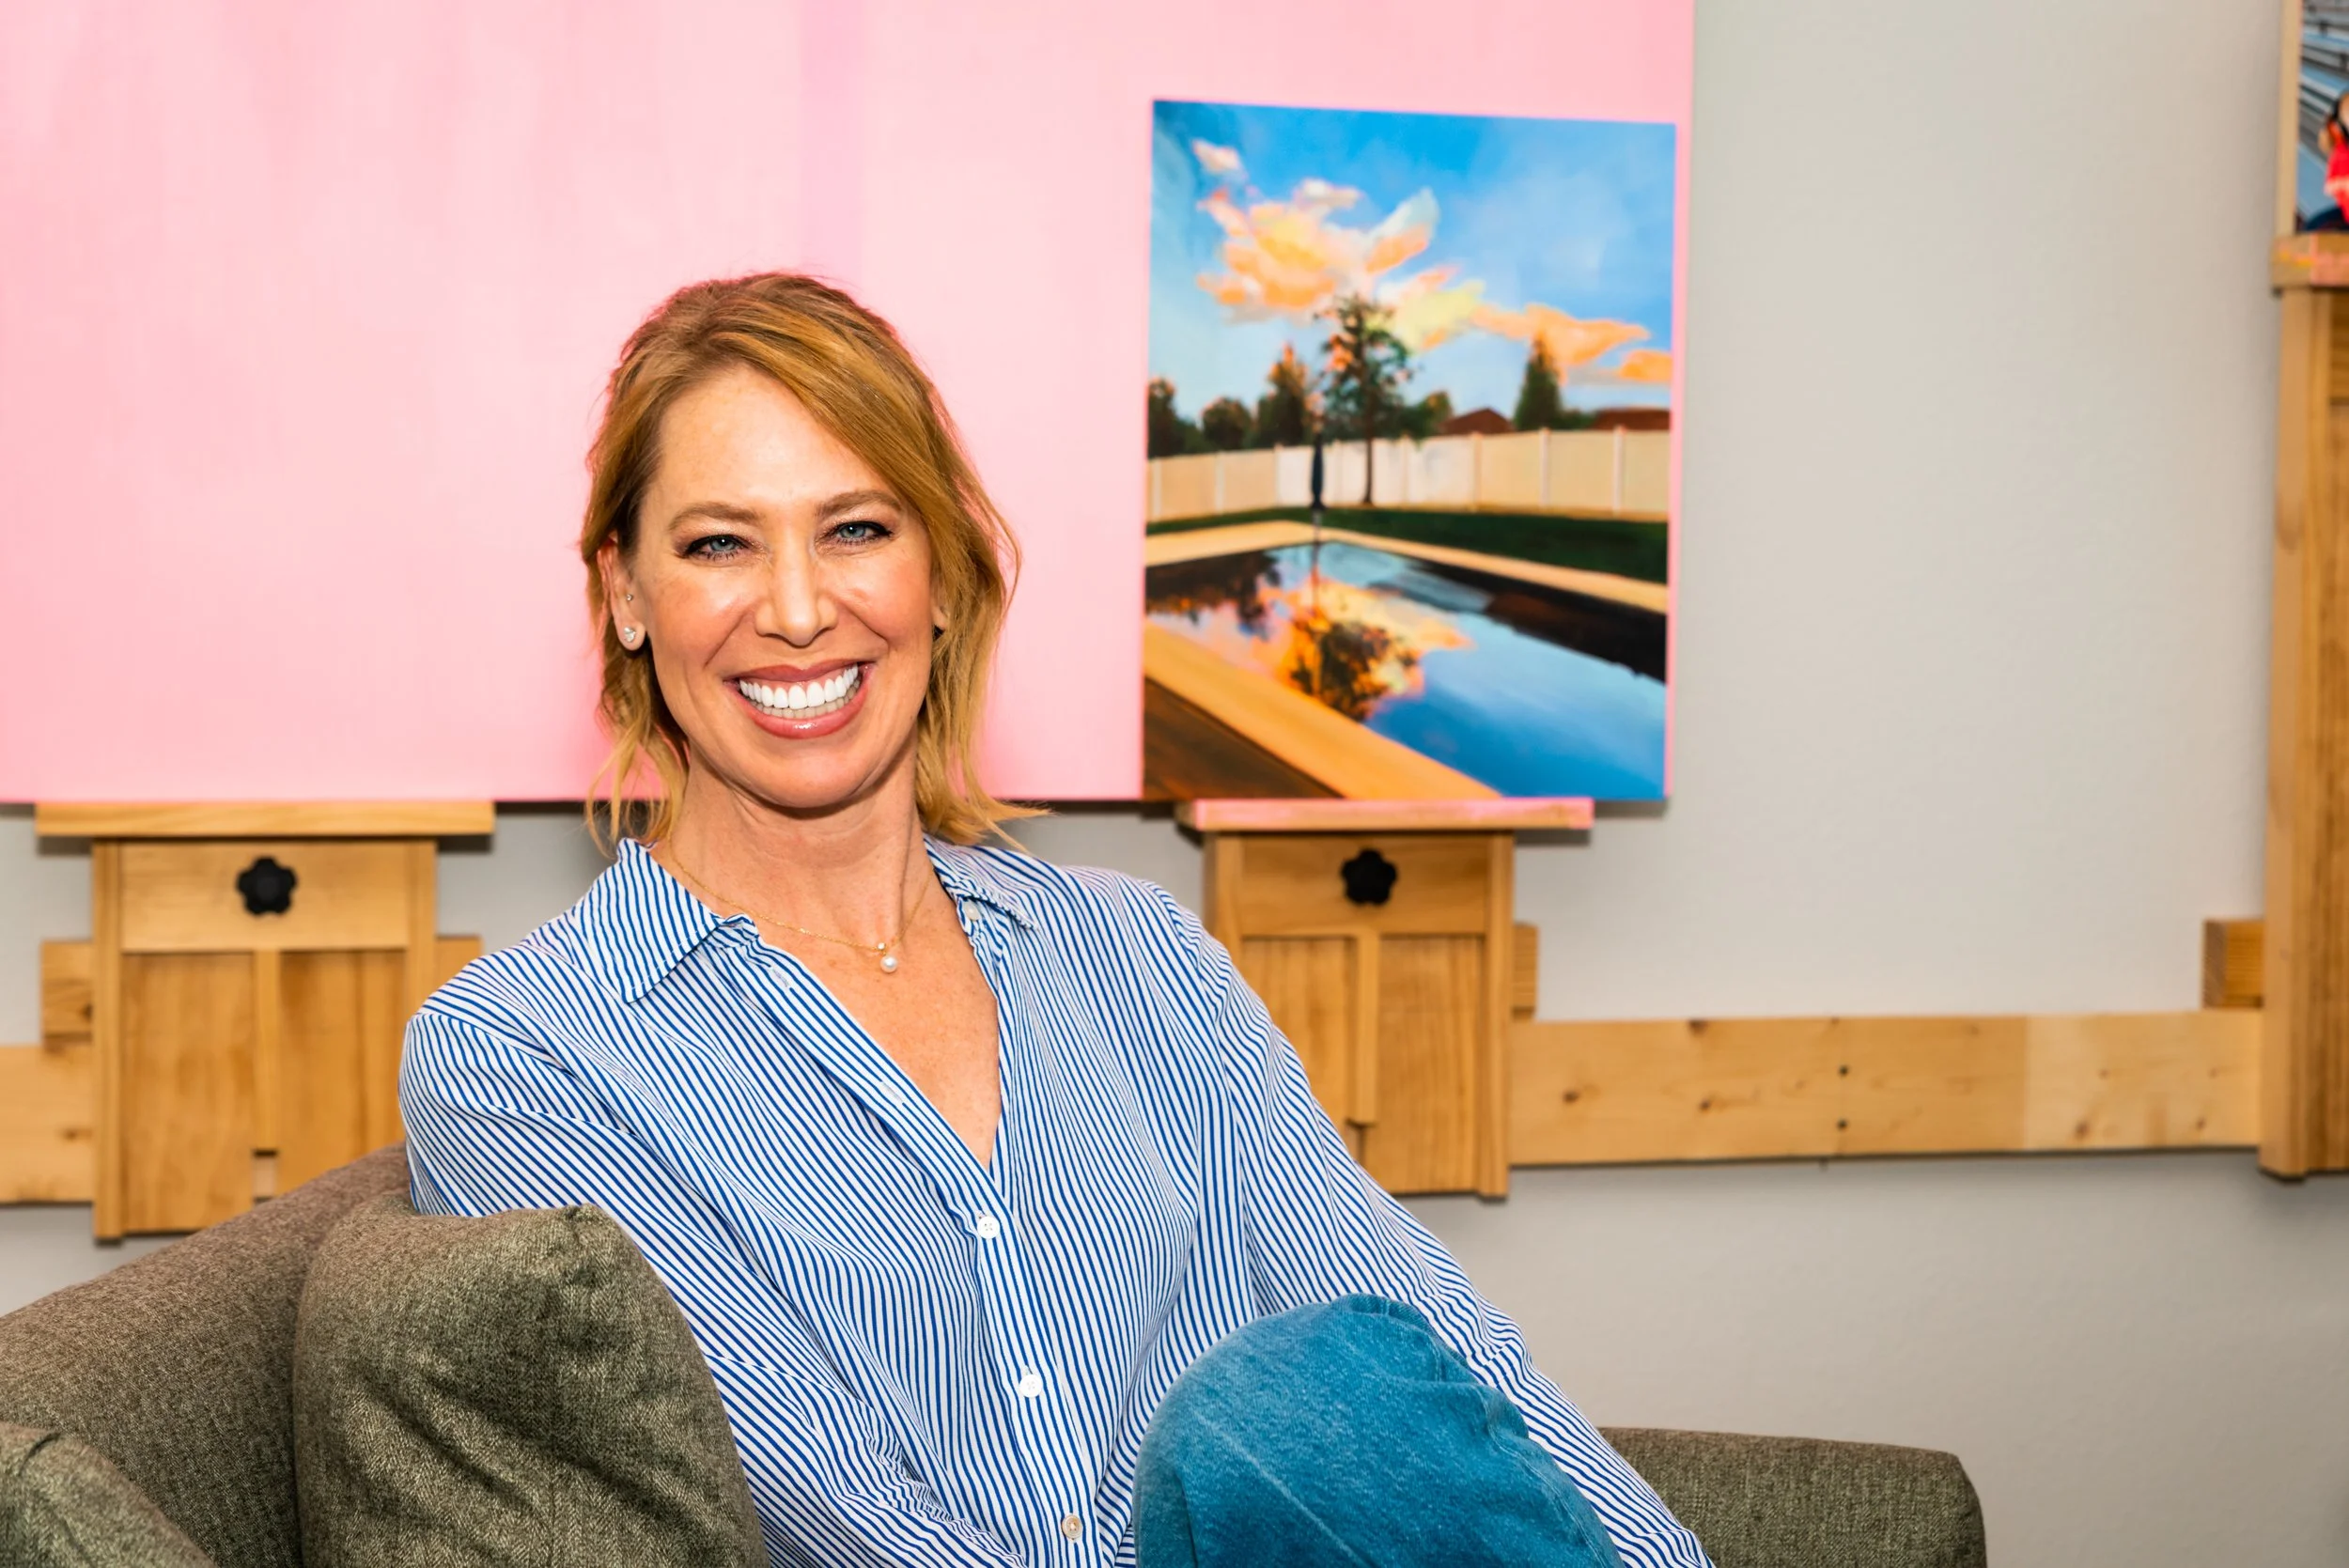
High School Seniors: Natural, Confident, & Totally You
Senior year is full of big moments and your senior session should be one of them! Whether your teen is outgoing or a little camera shy, my sessions are designed to bring out their real personality in a fun, relaxed way. Here's how we make that happen:

Choose Outfits That Reflect Their Vibe
Bring 2–3 outfits based on the session length: one casual, one a little dressy, and one that’s meaningful. Think sports uniforms, letterman jackets, band gear, or even their college tee or cap & gown. We want their personality to shine, not just their smile.
Pick a Location That Feels Right
Nature trails, open fields, parks, or even a favorite hangout spot will set the right tone with the right location. I’ll help guide you if you need ideas, but think about a space where your senior feels relaxed, grounded, and themselves.
Let’s Talk Golden Hour
We time sessions around that soft, dreamy light which is right before sunrise or sunset. It’s the perfect setting for glowing skin tones, flattering shadows, and timeless images.

Bonus Tip: Bring a Hype Crew
A parent, sibling, or best friend can help ease nerves and bring out natural laughter and real emotion. Plus, they’re great for behind-the-scenes phone pics!
Your teen only gets one senior year. Let’s make it unforgettable and create images you’ll love for a lifetime.
Ready to book or have questions?
Let’s chat and start planning their session!
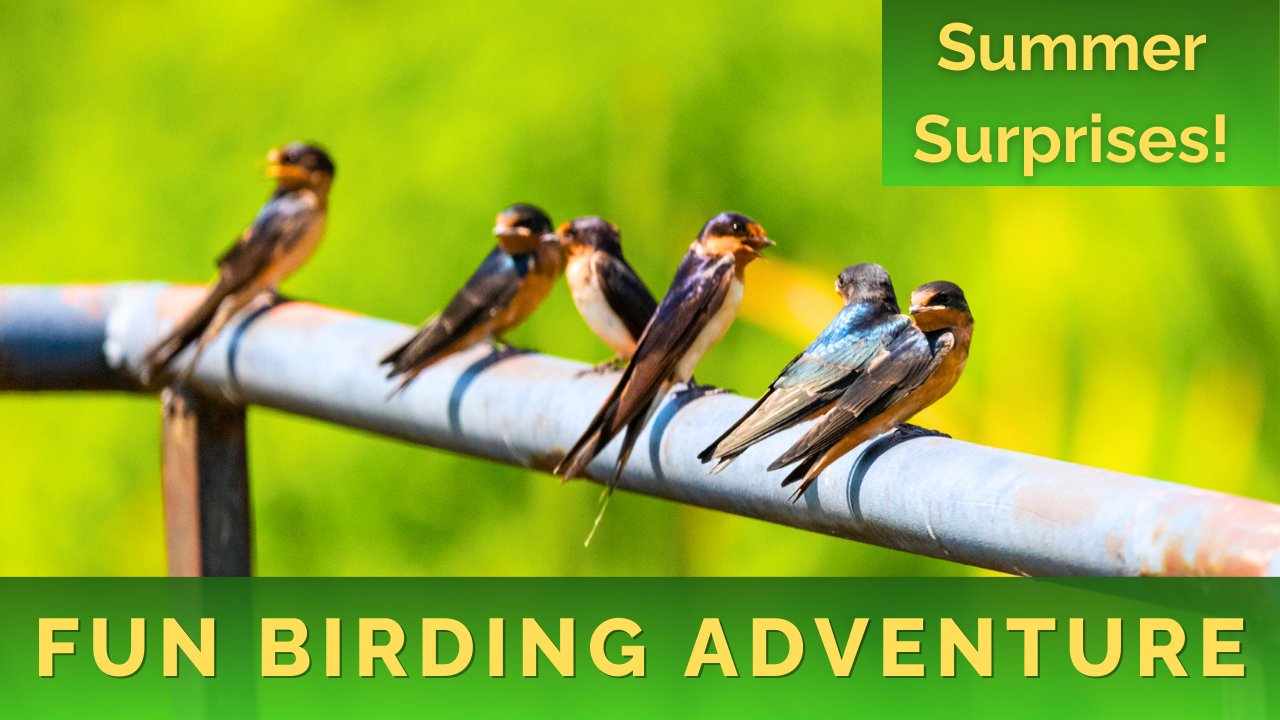
🦆Why Lake Apopka Might Be Florida’s Best Summer Birding Spot🦅
Think summer birding in Florida is too hot to be worth it? Think again! You have the option to stay in your car, out of the sun, and with some AC on!
Join me for a full summer tour of the Lake Apopka Wildlife Drive in Apopka, Florida which is one of the state’s best birding and wildlife photography spots all year round.
In this video, we’ll explore why you shouldn’t skip summer visits here. We see unexpected bird sightings to stunning wildlife moments you won’t believe (so many babies!!!). Lake Apopka has surprises around every bend. You’ll see wading birds, raptors, and other wildlife even in the heat of summer!
📍 Why you’ll love this video:
Discover why summer is an underrated time for Lake Apopka (No migratory birds!)
Learn what species you might spot during warmer months
See why this might just be Florida’s best summer birding spot

Whether you’re a bird watcher, nature photographer, or just love Florida’s wild side, this is one drive you don’t want to miss!
🎬 What the Heck Is “Film Developer” in Dehancer? (And Why You Should Care!)
If you’ve ever wondered, “What is Film Developer in Dehancer?” Then this is the video for you. In this tutorial, we’ll explore how the Film Developer tool works, how it’s different from a Film Profile, and why combining both can take your color grading to the next level.

We’ll break down:
✅ What Film Developer does and how it mimics real analog film processing
✅ The difference between Film Developer vs. Film Profiles in Dehancer Pro
✅ How Film Developer controls contrast, gamma, color separation, and saturation
✅ Why using both tools creates more authentic cinematic film looks
✅ When to use Film Developer in your color grading workflow
Whether you’re into video editing, photo editing, film emulation, or color grading tutorials, this video will help you understand how to use Film Developer for stunning results.
📌 Perfect for: Dehancer beginners, film look creators, cinematographers, photographers, and anyone looking to master cinematic color grading.
💬 Got questions or ideas you'd like me to dive into? I'd love to hear them! Drop a comment below and let me know how I can help support your photography journey. Let’s grow and create together! Please share with others who you think would enjoy this content as well!
Unlock Your Photography Potential and join 200+ Photography Enthusiasts!
Subscribe to The Wise Wing publication and get instant access to your FREE guide:
"How to Step Up Your Photography Skills in 5 Easy Steps"
Trusted by a growing community. Start leveling up your photography today!
👉 https://www.wiseimagesphotography.comhttps://www.wiseimagesphotography.com/join
What Wildlife Photography Teaches Us About Ourselves
Over the past few years my life has changed dramatically. I went from being very active to learning how to stay still. Although I am getting stronger daily, it was a forced lesson I didn't want due to my health. I had to figure out how to see life through a different lens after everything I had been through and seen.
I found as I had to sit often and wait, it was in the quiet moments before a bird takes flight or watching birds as they feed, you learn a lot just by observing and can find it just as enjoyable!

My view sitting in the shade with my buddy Beau!
Just like I had to learn to let go of the way things use to be, in order to do wildlife photography is a lot of letting go of control. Animals move on their own terms. Light changes without warning. The moment you’re waiting for might never come or it might come in an instant; gone before your lens is ready. In those moments, we learn patience. We learn how to wait without expectation, to watch without needing to intervene. That patience teaches us more than how to shoot; it teaches us how to live.
We also learn humility. Nature doesn’t cater to our schedule or vision boards. What you had can be gone in a heartbeat. You can hike for hours and come home without a single “keeper,” and still find yourself grateful. The simple act of being there, of witnessing something wild and free, is often the reward itself. We’re reminded that not everything beautiful can or should be captured; some things are meant just to be seen, learned from, and remembered.
Then there’s presence. Wildlife photography demands it. If your mind drifts, you miss the bunny emerging from the underbrush or the osprey’s plunge into the lake. The camera becomes a tool for mindfulness not a distraction, but a tether to the now. In slowing down to match the rhythm of the wild, we reconnect with parts of ourselves that are often lost in the daily grind.
In the end, wildlife photography isn’t just about the animals. It’s about us learning to be still, to observe with reverence, to be grateful for what we have, and to see the world and ourselves not as something to conquer or make perfect, but as something to understand, nurture, and cherish.

Is This Calendar-Worthy? 🧐 Pro Photo Critique of My August Shot
In this video, I break down my August calendar photo a stunning shot from Sanibel Island. We’ll talk about composition, time to capture shore birds off tides instead of lighting times, story, and editing choices, and whether it truly deserves a place on the wall. Plus, I’ll share how I captured this moment, and what I’d improve next time. If you love photography, bird shots, or calendar-worthy images, this is for you!

💬 Got questions or ideas you'd like me to dive into? I'd love to hear them! Drop a comment below and let me know how I can help support your photography journey. Let’s grow and create together! Please share with others who you think would enjoy this content as well! 📸✨👍 Remember to Like, Subscribe, and turn on the notification bell 🔔 for more nature, photography tutorials, and fun filled adventures!
Get your FREE Guide: "How to step up YOUR photography Skills in 5 Easy Steps": https://www.wiseimagesphotography.com/join

Looking for “Old Florida”? You NEED to See This Place! | Birding Paradise

In this episode, we explore the Joe Overstreet Landing area, one of the last truly untouched gems of "Old Florida." If you’re into birding, wildlife, or just want to escape into nature, this is the place for you. I was amazed at the variety of wildlife — from marsh birds and shorebirds to raptors, songbirds, and yes... even cows grazing freely in the distance! While I focused mostly on the stunning scenery and bird activity, it’s worth noting that Joe Overstreet Landing also offers camping and scenic boat rides, making it a perfect destination for a weekend escape into nature. 🌿 If you're craving a real Florida experience — the kind that’s quiet, wild, and teeming with life — this video and area is for you.
💬 Got questions or ideas you'd like me to dive into? I'd love to hear them! Drop a comment below and let me know how I can help support your photography journey. Let’s grow and create together! 📸✨ 👍 Remember to Like, Subscribe, and turn on the notification bell 🔔 for more nature, photography tutorials, and fun filled adventures!
Get your FREE Guide: "How to step up YOUR photography Skills in 5 Easy Steps": https://www.wiseimagesphotography.com/join

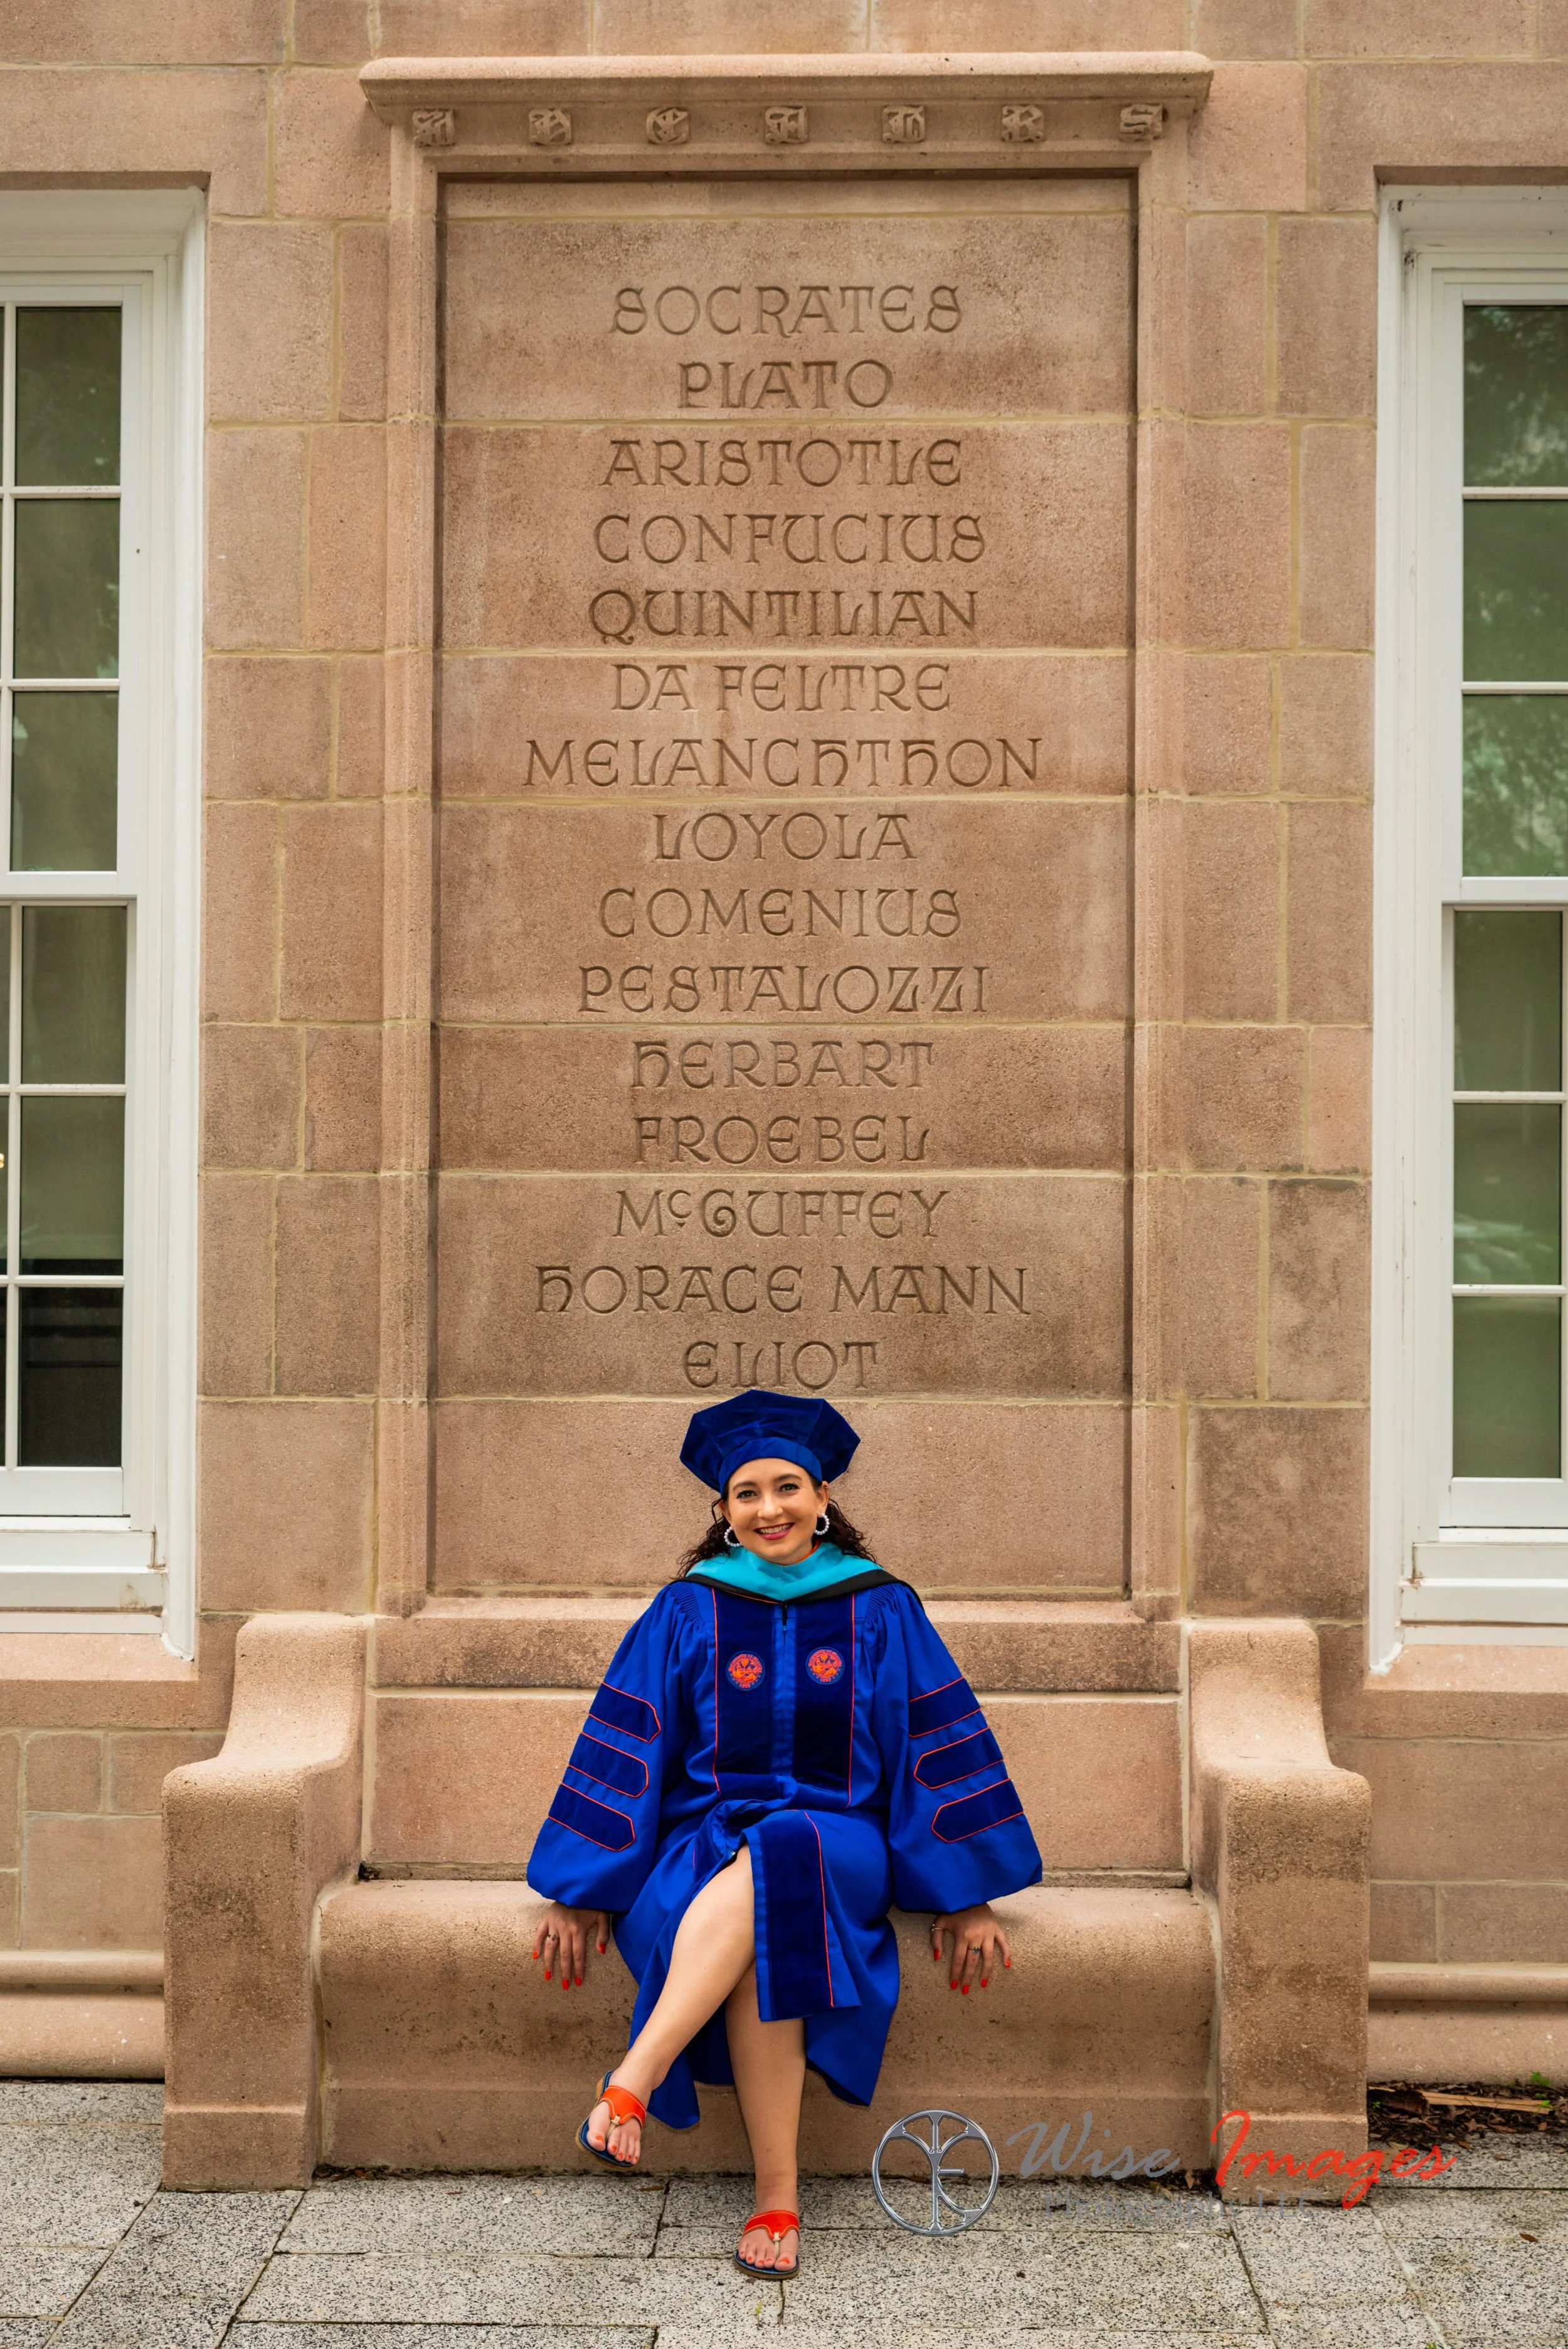
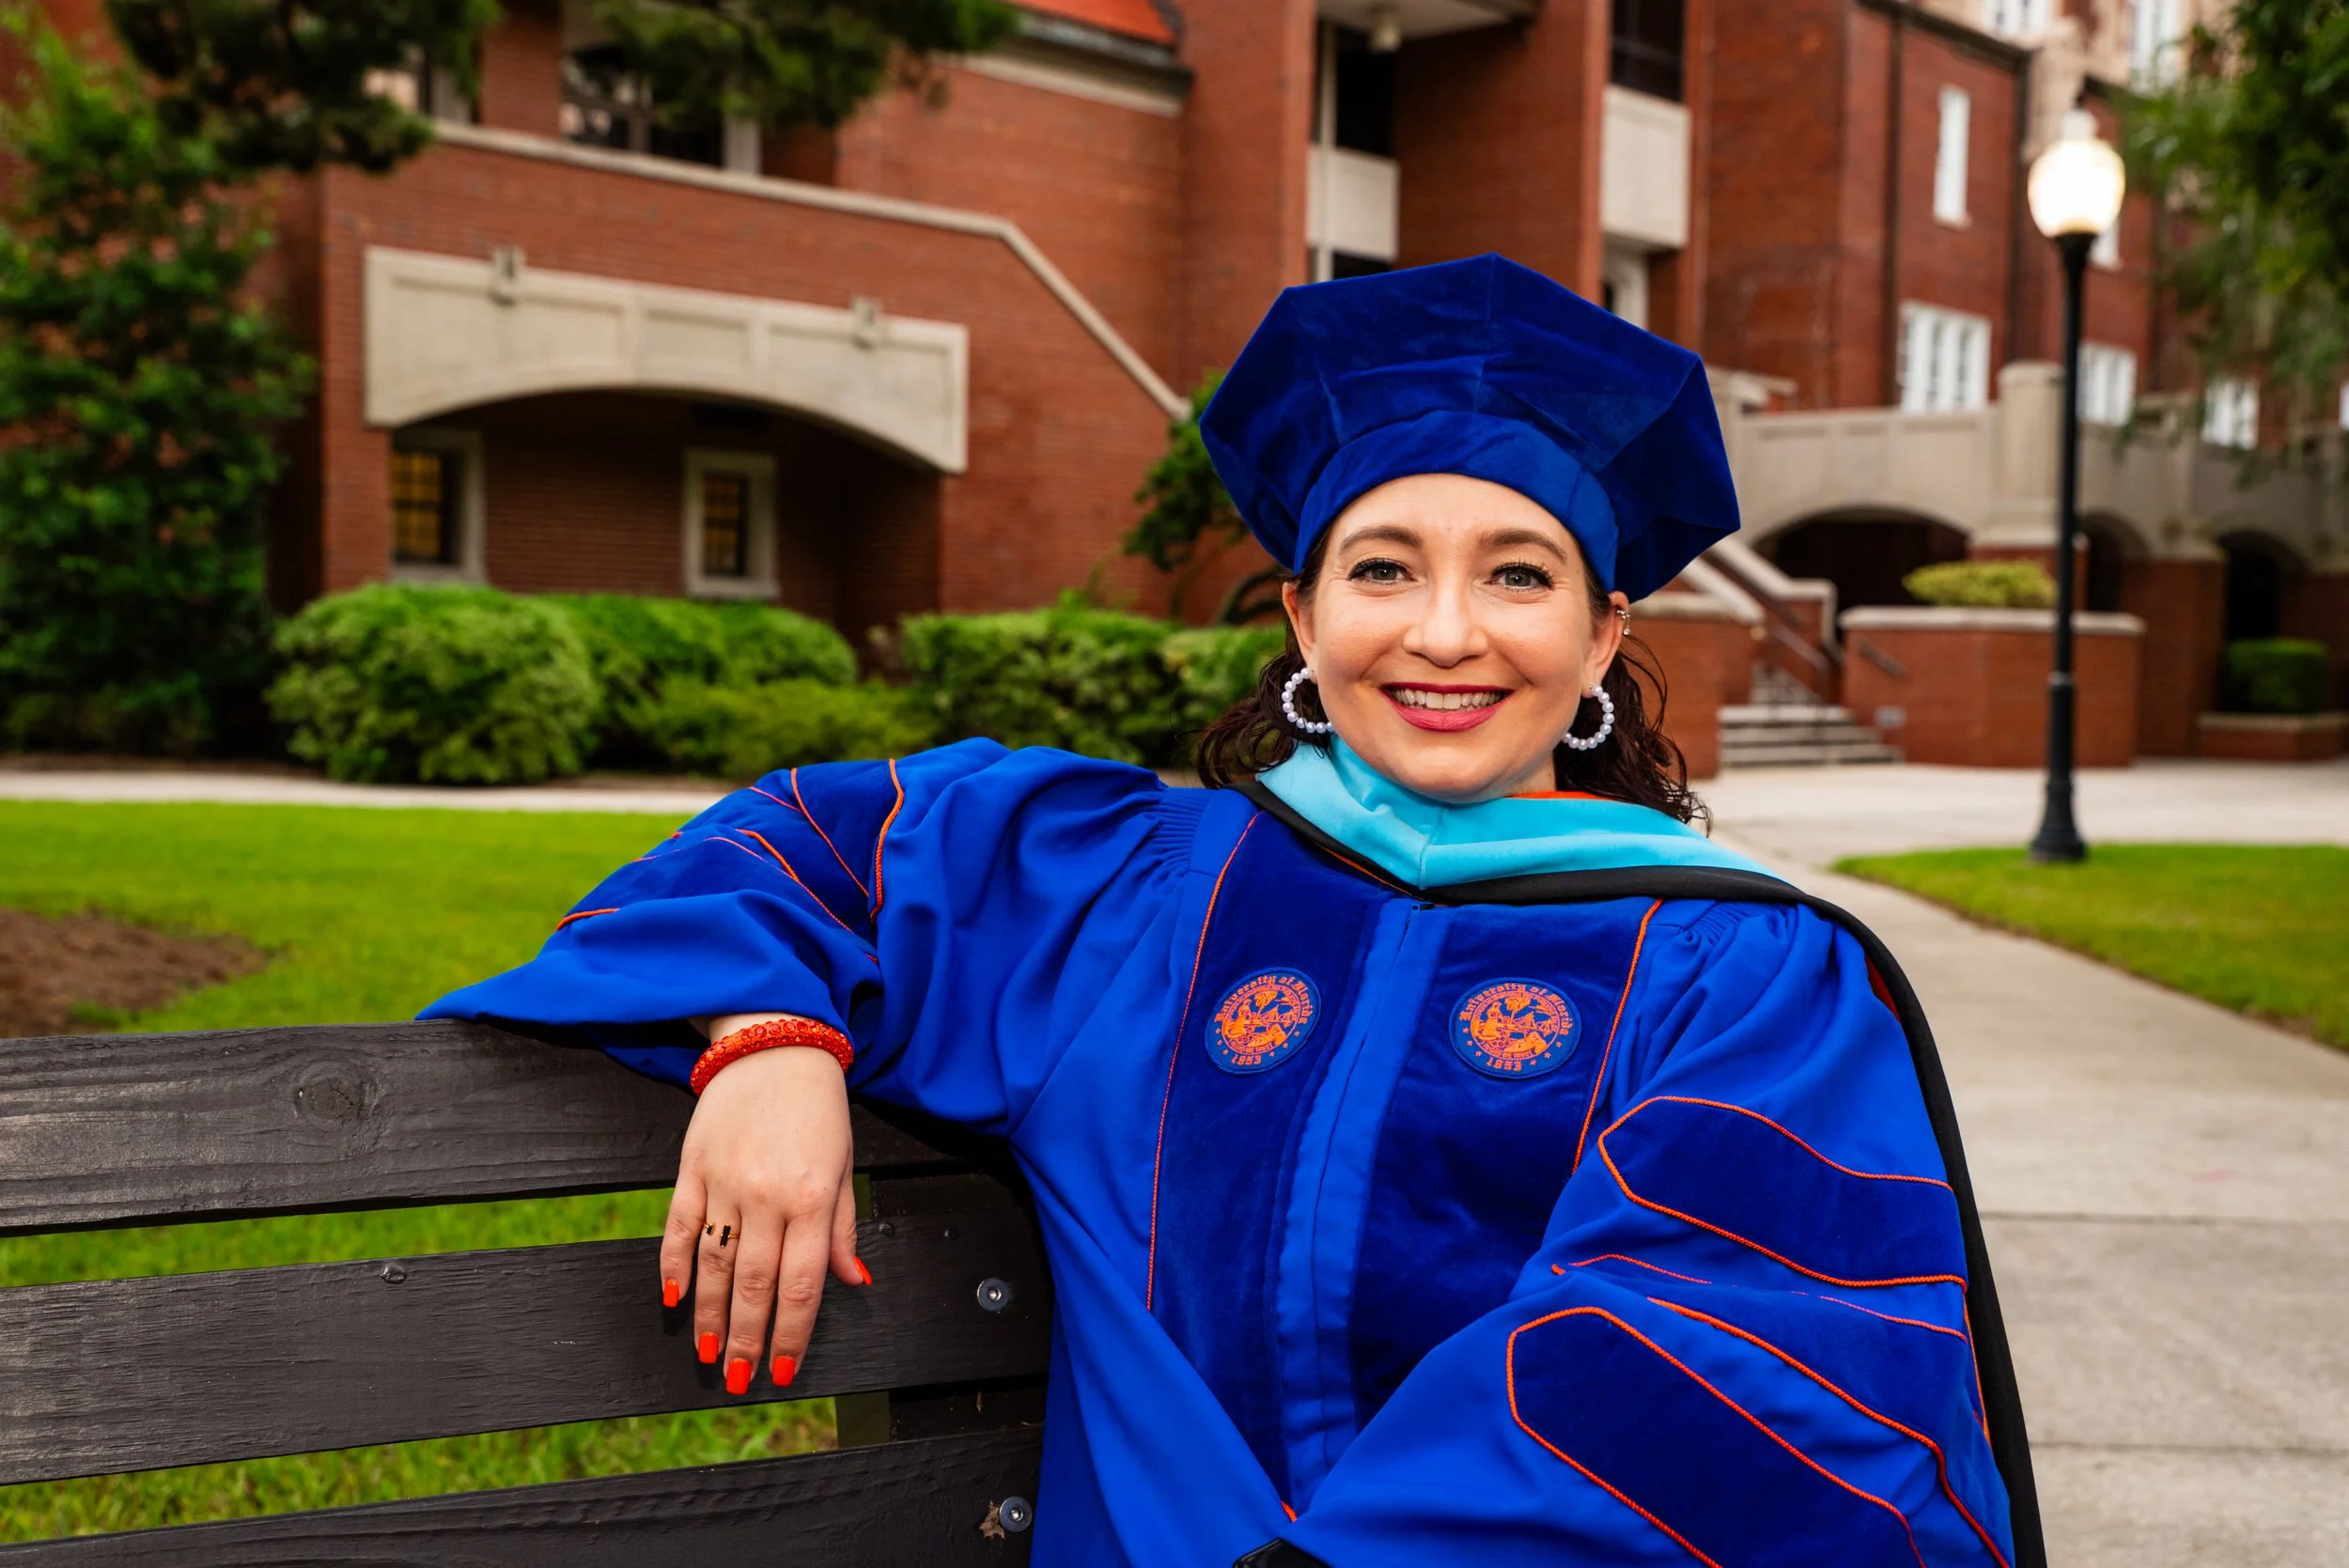
College Graduation Photography Session with Doctor Emma; Gainesville, FL
First off I want to say a huge congratulations to Doctor Emma for earning her doctorate! We had so much fun on this session. This goes over a little bit of the process of us working together and what happens when working with me!
Pre-session
Faylyn and I spoke on the phone about getting imagery of her when she was going to graduate with her doctorate. We spoke about the different shots and where she wanted to go during the session. We talked about 5 different locations on the University of Florida campus and about the lighting challenges we would face shooting into the night. Faylyn knew which areas were more open and would let in more light and which areas would be a bit more challenging as we progressed into the night and we planned our route accordingly. She also wanted us to end where all the bats come out at night! She thought I would find it fascinating and I did! Her main goal for the photography session was documenting this time and having printed images with the proof box.

The Session
We met late in the afternoon and headed over to the campus! She guided me through the school to the various locations. Her family came with us as well. We stopped by the tower, the bull, the stadium, some other areas, and ended by the bats. We had tons of fun and giggled throughout the session. Our main concern was rain and losing the light, however, we never saw a drop of rain and we switched to on camera flash as we lost the light giving her photos a completely different feel!


Post-session
About 2 and half weeks later we met online for the design and ordering session. We knew prior to our meeting we were going to be looking for 10 images to print and an image for the front of her proof box. First, we took time to enjoy the images with the picture video presentation. Afterwards we went through and picked out the images she wanted to have for her keepsakes. She liked a lot of them and purchased some additional prints. We both had tons of fun and enjoyed working with each other!

If you have any questions about graduation photography sessions, please reach out at 321-765-9473 or kt@wiseimagesphotography.com.
Wise Images Photography is based near Orlando in Montverde, FL. KT has been serving the Central Florida area for over 15 years!

4 things to know when planning your photography session
Are you not sure what to expect or where to even begin when looking for a photographer and photography session? My hope is this article will help to answer some of the questions you should think of when hiring a photographer!
1. Pick the right photographer according to their style and personality
Find a photographer’s work who resonates with you. If you don’t like their style, then you probably aren’t going to like the photos they take of you! It won’t matter even if you do like them! If you love the photographer's work, set up a meeting to talk with them and make sure you all can work together well. It isn’t just about the photos they produce, it needs to be the whole package, if you all jived when chatting about the photography session the session should go off beautifully! If you don’t jive, then you will more than likely be tense in the photos and this will show! It can be a lot of pressure finding the right photographer so take your time! This is a special moment and you want to have the right person capturing this memory!! Make sure they are offering the services you are looking for as well! Do you get the digitals only, do you get prints, artwork, albums, or more?
2. Picking the perfect location
Most photographers have locations they are familiar with and your photographer can help you with this. I suggest finding a location which means something to you! If you don’t have a favorite location, here are some ideas to get you thinking about what you would like for your session. Do you love the ocean, woods, city life, or a quiet park? Are you casual or formal? Let me know what you are looking for and I can offer some suggestions from my list.

3. Dressing for the part
You need to think about how you want these photographs displayed and what you want them to show others. I suggest picking something which is stylish, fits your personality, and when you look back in years to come you fondly love this piece of artwork we will be creating. I have a how to prepare for your session list ready for you when you book your session. I’ll be more than happy to give you a helping hand in ideas for your apparel.

4. Have fun and relax
It is normal to get nervous in front of the camera! During your photography session, I want you to have fun! We will plan ahead for your session by picking the location, what will you wear, and by just having fun and going with the flow you and I will be making fun memories! During the session, sometimes I will give you some direction and other times, I will let you be to capture that moment!

Reach out if you have any questions at 321-765-9473!
Wise Images Photography is based near Orlando in Montverde, FL. KT has been serving the Central Florida area for over 15 years!

How to get a BLURRY background with CELL PHONE? Bokeh made easy! (Part 3)
In this episode, we will talk about how to get a blurry background with a cell phone! This is the last of a three part series to help you understand how to get those creamy backgrounds you are looking for in your photographs!

If you want to see more examples and go more in depth with a DSLR, make sure you check out the links below!
How to get a BLURRY BACKGROUND with 3 EASY tips! (Part 1)

How to get a BLURRY BACKGROUND with 2 EASY tips! (Part 2)//Aperture and Lens Compression

Wise Images Photography is based near Orlando in Montverde, FL. KT has been serving the Central Florida area for over 15 years!
4 Ideas on what to wear for a photography session
Trying to figure out what you want to wear on a photography session can be a daunting task. I hope some of the ideas below will help you out. You want the session to showcase your personality, however, you also want to be comfortable at the same time!
Compliment your skin tone
Look for a color which complements your skin tone. If you try to match your skin tone with the tones in your clothes, you may find there will be no contrast and you will blend in with your outfit. I would caution in wearing white as our eyes are drawn to the brightest part of a picture. We want you to be the one shining!

Coordinate the outfits and don’t match each other
I wouldn’t try to make everyone one match each other. I would try using complimentary colors to coordinate your outfits together. Some patterns are alright, however, I wouldn’t get too many patterns, logos, and crazy colors because it might make you all clash and distract from the photograph. Now if you are going for a themed shoot, that is totally different. Something some folks forget about is making sure you have matching socks with your outfit!

How layering helps with outfit changes
I’m often asked about outfit changes. I would recommend 2 to 3 looks max. I have found when you try to do too much in an hour or less session, the focus becomes the clothes and not you! Remember you are the star! One way to make the changes easier is by using layers, for example, you can accessorize with a vest, jacket, jewelry, or hat to make for more interesting photos. If you want to include a hat, I would wear it for the last shots so you don’t mess up your hair unless you want it for the whole shoot.

Choose comfortable clothing which looks great
I’m all about having a cute outfit, however, certain clothes might not be the best for a photography session. Keep in mind you may be kneeling, bending, or even laying on the ground to get a variety of poses. Clothing which is low cut, too short or too sheer can affect your photos.

Here are some extra tips to help you get ready for your session. Make sure your clothes are ironed. Please bring a towel to pat yourself with because it gets hot in Florida. We don’t want you to shine too much! If you plan on getting your hair trimmed and/or colored, it is best to do this a week or two before the session. Making sure your nails are ready is important as well! Gentlemen can usually get away with their cut closer to the photo session and don’t forget to take care of your nails as well! Spray tans should be done a couple of weeks before your session. Lastly, be careful of food choices before your session to prevent staining your teeth. No one wants blue teeth!

Not sure about your clothing choices for the photo session you booked with me? Send me pictures of what you want to wear and I’ll guide you through the process. I want you to have fun and the more we prepare beforehand the smoother the photo session will go! Remember if you are comfortable, it will show in your photos!
Wise Images Photography is based near Orlando in Montverde, FL. KT has been serving the Central Florida area for over 15 years!

How to get a BLURRY BACKGROUND with 2 EASY tips! (Part 2)//Aperture and Lens Compression
In this episode, I am going to go over/show you how aperture and lens compression help you achieve the blurry background you are looking for in your photographs!

If you missed the first part of this series on how to get a blurry background, check it out here!! I give you 3 tips to try out and you don’t even have to adjust your camera settings!

Wise Images Photography is based near Orlando in Montverde, FL. KT has been serving the Central Florida area for over 15 years!

Is photographing in the middle of the day a bad idea?
Photographing in the middle of the day comes with its own sets of challenges. The harsh sunlight can make it easy to blow out the highlights, make people squint, and create overly harsh shadows. However, this doesn't mean you need to rule out this time of day!
Here are some tips to make this time of day work for you!
1. Use Shade: You can use the side of a building, over hang, or go under a tree to find shaded areas which will soften the light.

3. Use Reflectors: Using a reflector will allow you to bounce light onto your subject to fill in shadows. If you don't have a professional reflector, you can also look around and see what objects could potentially be used to bounce light off of! Think of things like lakes, hills, or other big items .
4. Use scrims: Using a scrim will create even lighting and get rid of the harsh shadows under the eyes. Depending on the size of your subject will depend on the size you will need

I used a scrim to soften the shadows in this photo.

This is an example of why you need to get creative and find the shade or have a scrim. Look at the harsh shadows! Also notice I was getting reflections off of the jewelry.
5. Experiment with Angles: Changing your angle can help reduce harsh shadows or you could create cool images by using the shadows created by the harsh light. So remember to move your feet and change your height!
Yes it can be more difficult to photograph in the middle of the day, however, it can also help you to create unique opportunities or as in the photo below make you feel like you are just out catching some rays on a typical sunny day!

This image was taken in the middle of the day and it really encompasses old Florida in my opinion. I think there is nothing wrong with it. This is what I think of when I think of my old Florida!
If you are interested in learning more, make sure you check out my YouTube Wise Images or reach out for a one to one session! If you have any other business inquiries, please reach out at 321-765-9473.